Dirt bikes are becoming popular among both adults and kids. But, these adventurous rides can be risky many times. The high-speed biking and balancing issues have brought the kid’s safety into question.
If you are thinking of installing training wheels on Dirt Bike, then you are on the right path. If your child does not know how to balance or ride a bike or pedal bike, you should opt for installing training wheels on a dirt bike.
Let us dig into the following article to know the detailed steps to install training wheels on dirt bikes for the better safety of kids and adults.
But before that do you know how training wheels work?
The training wheels for bikes work the same as those of bicycles but fit in the middle frame. It is a wide axle rod running below the bike’s frame with training wheels at both ends. It provides extra support for balancing better on the bike. The training wheels of the bike encourage to ride the bike securely and confidence of better support. They also help the individual to learn control more swiftly.
9 Steps for Installing Training Wheels on a Dirt Bike
Installing training wheels on a bike is easier than it seems. Parents can either ask a technician or install the wheels on their own. The detailed steps to install training wheels on the bike are as follows:
Step 1: Find the Proper Training Wheels for Dirt Bike:
Most dirt bike manufacturers do not sell training wheels. You can find the perfect training wheels for the dirt bike at an accessory seller’s shop. Training wheels come in various sizes and types and this might create a state of confusion. To avoid confusion you can readily opt for universal training wheels for dirt bikes. Universal training wheels for dirt bikes can fit most the bikes. But, then too before buying, checking with the manufacturer is advisable.
Step 2: Prepare the Installation Equipment:

Before installation check, if you have all the installation equipment. The installation pieces of equipment include:
- Training wheels
- Vertical brackets
- Washers
- Nuts
- Shoulder bolts
- Bracket brace plates
Other than these you should have stabilizers. Stabilizers usually come with the other installation pieces. Also, arrange for a regular wrench and adjustable wrench, measuring tape and pair of pliers.
Step 3: Dirt Bike Tire Pressure:

The tire pressure of a dirt bike is usually at 12psi on the front tire and 12.5 on the rear tire. The pressure should be correct before working with the stabilizers. The tires have only two patches of rubber that connects to the ground. Hence, tires are in good condition and, correct pressure is crucial. The tires with the apt pressure will be strong and supportive during the installation of training wheels. Once you ensure the precise pressure, mount the stabilizers.
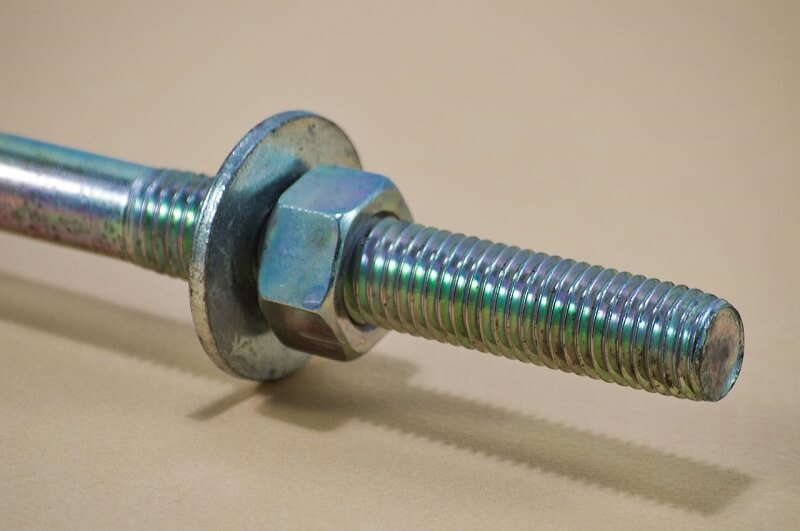
Step 4: Assemble Hardware:

We have all the installation hardware we need to install training wheels for the bike. Now, it’s time to assemble them. First, insert a bolt through one stabilizer then, through the washer and onto the stabilizer arm. Then, attach another nut and washer and tighten them using the wrenches. Attach the wheels on the axle with grease fittings to the inside. If the wheel bearings feel tight, sand paint off the axle. In many cases, stabilizers come with assembled hardware. In such cases, you can skip the step of assembling the hardware.
Step 5: Remove Axle Hardware:

After assembling the hardware remove the rear axle from the bike’s wheel axle. Loosen the rear wheel bolts and use the wrench to hold the bolts. It will prevent the moving of the wheel. Keep them handy as we would need them again in the further procedure.
Step 6: Vertical Brackets:
You can now place the vertical brackets on the bike’s axle by inserting the tab onto the open space of the frame. Only place the bracket on and, do not fasten with any nuts.
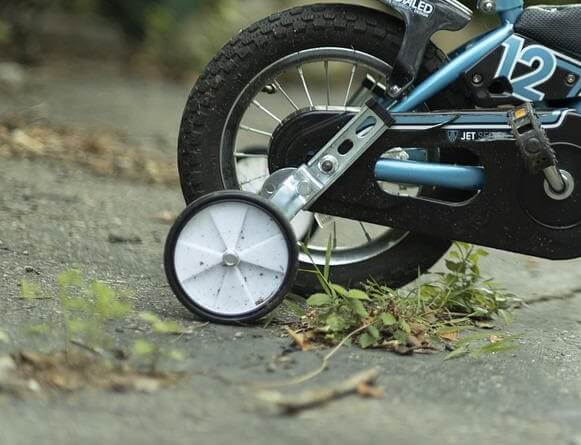
Step 7: Attach Training Wheels:
Now, attach the previously assembled training wheels to the vertical brackets. Adjust the height of the wheels according to your requirement. Fix the raise points on the end of your bike frame to adjust the height of the stabilizer to 0.5 to 1 inches. Measure this dimension by putting clamps underneath the wheels. This clamp can be anything from a wooden block to a uniform stone. Once you attain the apt elevation, the next step is to tighten the axle nut tightly using the adjustable wrench.
Step 8: Refit Axle Hardware:
Next, put back the axle hardware that includes the washer and nuts. Refit the axle hardware and tighten it securely using the spanner. While attaching the bolts, make sure they match the threads with them. If not matched, they will not connect properly, and this might pressurize them into breaking the whole.
Step 9: Check the Uneven Support:
After the successful installation of training wheels on a bike, check the uneven support. Remember to check all the nuts from time to time to ensure the bolts are remaining tightened. It is essential to check the rough support before your kids ride the dirt bike. It is significant to check the uneven support to prevent any accidents while your kid rides the bike. Also, keep a check on the tightening of the nuts from time to time, and clean the wheels frequently.
Conclusion
These days’ dirt bikes are becoming more common among kids these days. Parents should opt for installing training wheels on their kid’s dirt bikes. The training wheels will give them extra support while riding and prevent any accidents as well. They also reduce the risk of falling from the bike and give more confidence to the kids. The article provides a step-by-step guide to installing training wheels on your young one’s dirt bike and making them ready for the adventure.
FAQ’s
Q: Can you add training wheels to any bike?
A: Beginners can add training wheels to their bike to improve stability. It is important to follow installation instructions for a safe experience.
Q: Are dirt bikes useful for Kids?
A: Dirt bikes for kids have been proven to be beneficial for the development of motor skills, promotion of outdoor activity, and fostering a sense of adventure and responsibility.
Q: What age can a kid get a dirt bike?
A: Children can start riding dirt bikes between the ages of 3 and 7, depending on their physical development, coordination, and the type of bike they are using. Safety should always be a top priority.
Q: Are dirt bikes safe for Kids?
Dirt bikes can be safe for children if they have appropriate safety gear, are supervised, and ride in designated areas. Safety training and helmet use can further reduce the risk of injury.